Hi friends,
This is a picture heavy post.
I got a request from my colleague to decorate her pen stand. Here it what i have made with embossed pattern paper,handmade roses,pearls, and laces.
 |
| Decorated Pen stand |
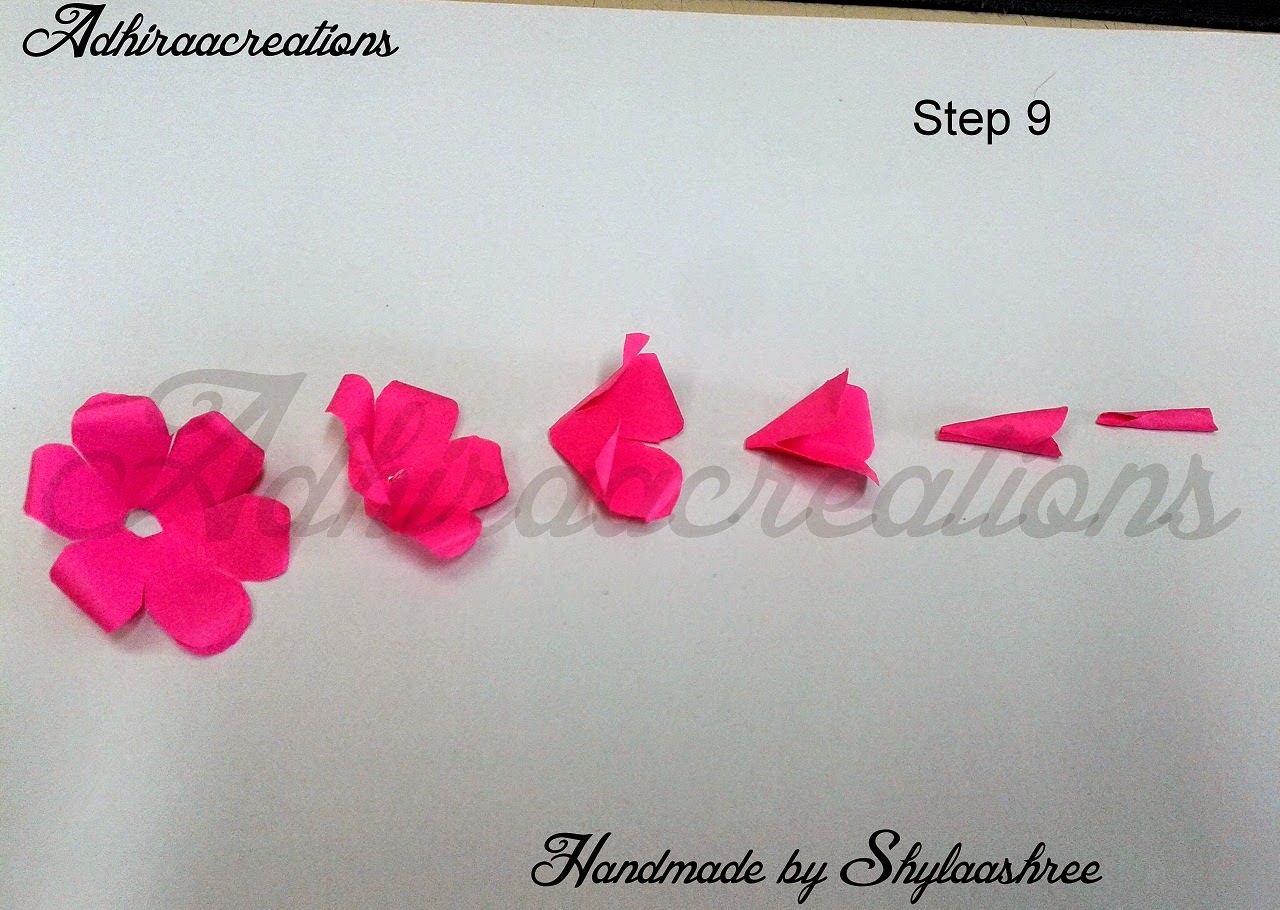
Here is the step by step tutorial to make rose.
 |
| Take three square paper of same size |
 |
| Fold diagonally |
 |
| further fold and draw the pattern as shown above |
 |
| Cut on the drawn lines |
 |
| Cut 1, 2 and 3 petals as above |
 |
| Fold the edges like above |
 |
| Glue it |
 |
| Fix one above the other in the order shown above |
 |
| Final product - Paper rose |
So you don't need any punch or special equipment to make such beauties.
Thanks for visiting.


Wow! It's very gorgeous!
ReplyDeleteVery simple and clear tutorial, thank you. Decoration with rose lovely. Regards
ReplyDeleteThe pen stand look beautiful loved the addition of pearls..and lovely tut :)
ReplyDeleteGreat tutorial Shylaa!
ReplyDeleteBeautiful, great tutorial for Rose. Thanks for joining us at 613 Avenue Create. PennyRae DT
ReplyDeleteNice tutorial Shyla, I am your newest follower now!
ReplyDeleteits such a beauty shyla... thanks for the tute
ReplyDeleteWhat a beautiful pen stand. I also love the handmade rose tutorial. Very inspiring. :D
ReplyDeleteThank you for joining us One Stitch At A Time.
Deborah DT
Gorgeous rose Shylaa... lovely pen stand.. :)
ReplyDeleteBeautiful! love how you made the flowers and your well photographed tutorial...might have to have a go at making some of them when i have the time! x Thanks for sharing with us over at Glitter n Sparkle - Vic, DT X
ReplyDeleteOh, how pretty! I love the pink flower... awesome layers. The pearls look wonderful. Oh, and I also like the embossed paper. So elegant. Thank you for playing along with us at Curtain Call Inspiration Challenge.
ReplyDeleteBeautiful container and lovely tutorial. Thank you for playing along this week at OSAAT. I sure hope to see you back again very soon. Good Luck in the challenge!!!
ReplyDeleteTTFN,
CraftyGirl OSAAT DT
craftygirlcardsandcrafts.blogspot.com
Very different, love the pink roses, good tutorial. well done need one in my craft room. thanks for entering the glitter n sparkle challenge Chris DT x good luck
ReplyDeleteWow, how lovely! Thank you so much for the tutorial; I am bookmarking it so I can refer to it later! Thank you for playing along with the stitchy angels!
ReplyDeleteHugs,
Chriss – OSAAT Design Team
www.chrissandlou.blogspot.com
Nice upgrade for the pen can. And thank you for the rose tutorial looks easy and the result is effective. Thank you for sharing with us at 613 Avenue Create this week.
ReplyDeleteCheers,
Aurora
Such a beautifully decorated tin :) Thank you for joining us this challenge at OSAAT and good luck. Hugs NIKKI DT
ReplyDeleteThank you for the tutorial......so easy to follow. I've saved it to my favorites and will show my craft group here in Cyprus your inspiring roses. Wynn fellow teamie Unstampabelles x
ReplyDeleteHow beautiful your rose looks and the penstand looks super elegant!!
ReplyDeleteCheers
Dr Sonia
Cards Crafts Kids Projects
That looks lovely. Thanks for sharing
ReplyDelete